
Home: Difference between revisions
No edit summary |
No edit summary |
||
| Line 4: | Line 4: | ||
<div align="center">[https://acg.uwa.edu.au/srmp/Downloads Download Flowchart]</div> | <div align="center">[https://acg.uwa.edu.au/srmp/Downloads Download Flowchart]</div> | ||
<imagemap>Image:Slide1.JPG|Subtitle of Image Map Slide1.JPG | <imagemap>Image:Slide1.JPG|Subtitle of Image Map Slide1.JPG | ||
rect | rect 31 23 199 82 [[Data_Collection|]] | ||
rect 34 | rect 34 88 197 162 [[1_Geological|]] | ||
rect 215 | rect 215 30 462 160 [[2_Mining|]] | ||
rect | rect 486 29 734 159 [[3_Geotechnical|]] | ||
rect 754 28 | rect 754 28 975 162 [[4_Seismic|]] | ||
rect | rect 24 203 160 303 [[Seismic_Response_to_Mining|]] | ||
rect | rect 169 206 371 318 [[5_Numerical_Models|]] | ||
rect 389 204 688 317 [[ | rect 389 204 688 317 [[6_Seismic_Analysis|]] | ||
rect | rect 705 207 976 320 [[7_Measurement_and_Observation_Trends_for_Forensic_Analysis|]] | ||
rect | rect 172 347 908 378 [[8_Understanding_and_Quantifying_Seismic_Hazard|]] | ||
rect | rect 31 414 234 475 [[Control_Measuers|]] | ||
rect | rect 38 483 231 564 [[9_Ground_Support|]] | ||
rect | rect 253 416 507 561 [[10_Exposure|]] | ||
rect 524 | rect 524 415 738 564 [[11_Mine_Design|]] | ||
rect | rect 752 417 986 483 [[12_Conditioning_Rock_Mass|]] | ||
rect | rect 29 612 776 686 [[Seismic_Risk_Assessment|]] | ||
</imagemap> | </imagemap> | ||
Revision as of 17:44, 10 June 2020
INTERACTIVE FLOWCHART
Click the headings and subheadings of the flowchart that you'd like to visit.
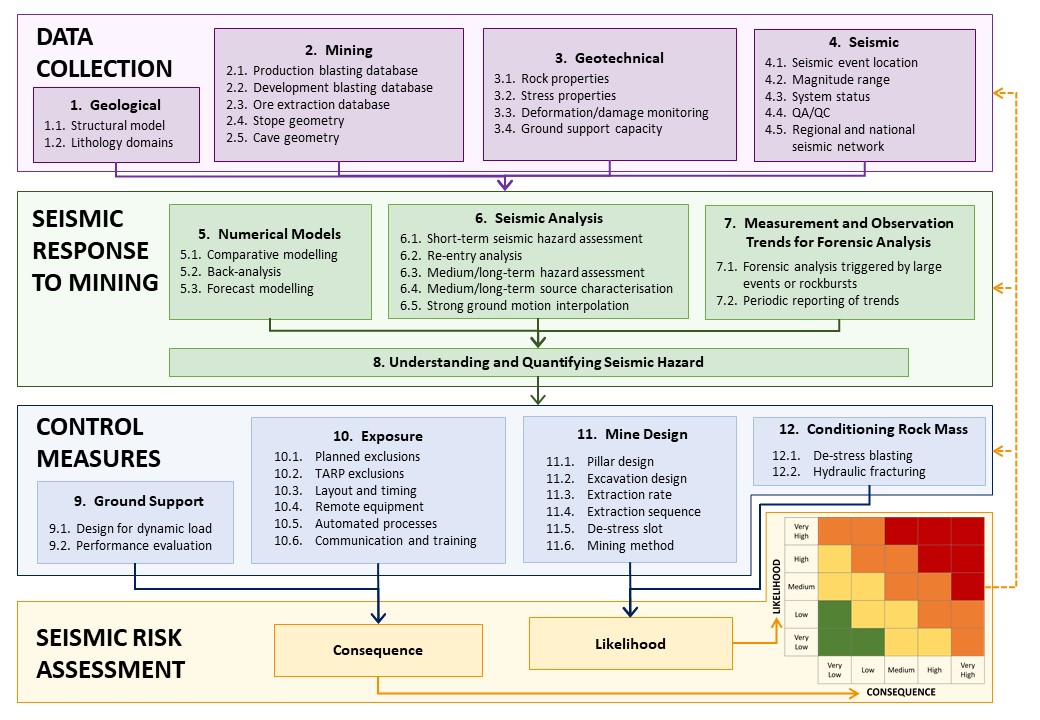
This flowchart and all variations of this flowchart are the copyright of the Australian Centre for Geomechanics
© 2020, Australian Centre for Geomechanics
- Download Flowchart
Welcome to the Seismic Risk Management Process Website. This website provides a summary of Seismic Risk Management Practices in hard rock mines and was developed by the Australian Centre for Geomechanics (ACG) with the financial support of Newcrest Mining Limited (Newcrest).