
Home: Difference between revisions
No edit summary |
No edit summary |
||
| Line 4: | Line 4: | ||
<div align="center">[https://acg.uwa.edu.au/srmp/Downloads Download Flowchart]</div> | <div align="center">[https://acg.uwa.edu.au/srmp/Downloads Download Flowchart]</div> | ||
<imagemap>Image: | <imagemap>Image:Slide1.JPG|Subtitle of Image Map Slide1.JPG | ||
rect | rect 21 20 203 81 [[https://acg.uwa.edu.au/srmp/Data_Collection|]] | ||
rect | rect 34 87 198 161 [[https://acg.uwa.edu.au/srmp/1._Geological|]] | ||
rect | rect 215 29 462 159 [[https://acg.uwa.edu.au/srmp/2._Mining|]] | ||
rect | rect 484 29 734 159 [[https://acg.uwa.edu.au/srmp/3._Geotechnical|]] | ||
rect | rect 754 28 974 160 [[https://acg.uwa.edu.au/srmp/4._Seismic|]] | ||
rect | rect 19 197 163 303 [[https://acg.uwa.edu.au/srmp/Seismic_Response_to_Mining|]] | ||
rect | rect 170 205 371 318 [[https://acg.uwa.edu.au/srmp/5._Numerical_models|]] | ||
rect | rect 389 204 688 317 [[https://acg.uwa.edu.au/srmp/6._Seismic_analysis|]] | ||
rect | rect 706 207 973 318 [[https://acg.uwa.edu.au/srmp/7._Measurement_and_observation_trends_for_forensic_analysis|]] | ||
rect | rect 170 347 906 375 [[https://acg.uwa.edu.au/srmp/8._Understanding_and_Quantifying_Seismic_Hazard|]] | ||
rect | rect 29 412 230 472 [[https://acg.uwa.edu.au/srmp/Control_Measures|]] | ||
rect | rect 36 481 232 563 [[https://acg.uwa.edu.au/srmp/9._Ground_support|]] | ||
rect | rect 251 417 504 562 [[https://acg.uwa.edu.au/srmp/10._Exposure|]] | ||
rect | rect 524 417 735 561 [[https://acg.uwa.edu.au/srmp/11._Mine_design|]] | ||
rect | rect 754 418 984 483 [[https://acg.uwa.edu.au/srmp/12._Conditioning_rock_mass|]] | ||
rect | rect 25 616 745 691 [[https://acg.uwa.edu.au/srmp/Seismic_risk_assessment|]] | ||
</imagemap> | </imagemap> | ||
Revision as of 15:03, 8 June 2020
INTERACTIVE FLOWCHART
Click the headings and subheadings of the flowchart that you'd like to visit.
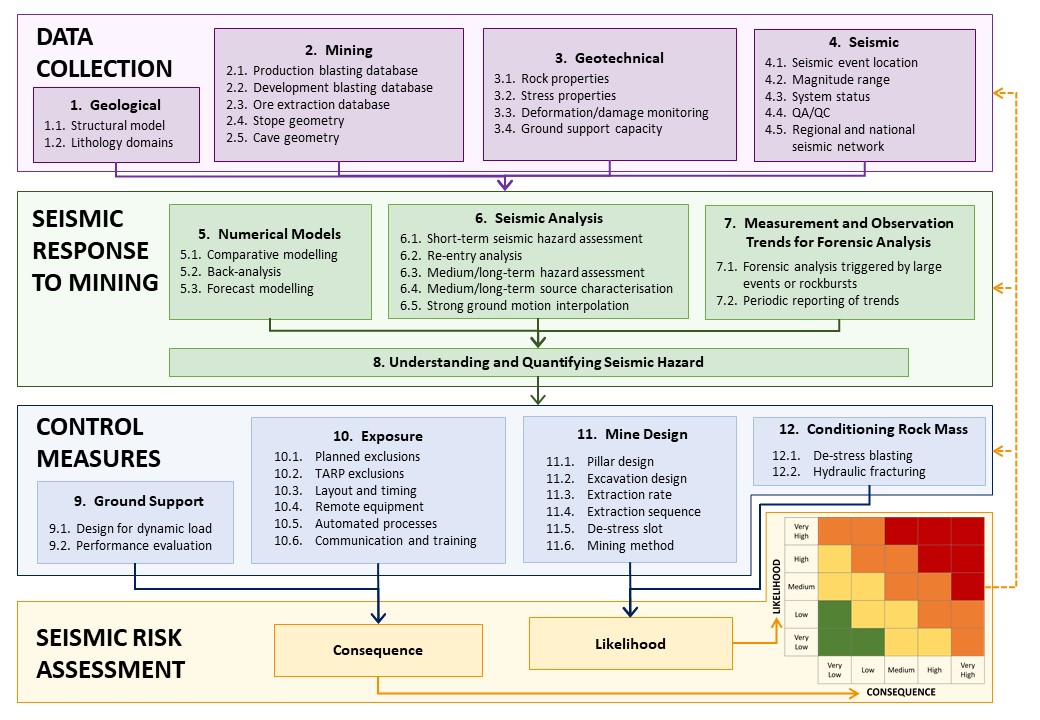
This flowchart and all variations of this flowchart are the copyright of the Australian Centre for Geomechanics
© 2020, Australian Centre for Geomechanics
- Download Flowchart
Welcome to the Seismic Risk Management Process Website. This website provides a summary of Seismic Risk Management Practices in hard rock mines and was developed by the Australian Centre for Geomechanics (ACG) with the financial support of Newcrest Mining Limited (Newcrest).