
Home: Difference between revisions
No edit summary |
No edit summary |
||
| (42 intermediate revisions by the same user not shown) | |||
| Line 2: | Line 2: | ||
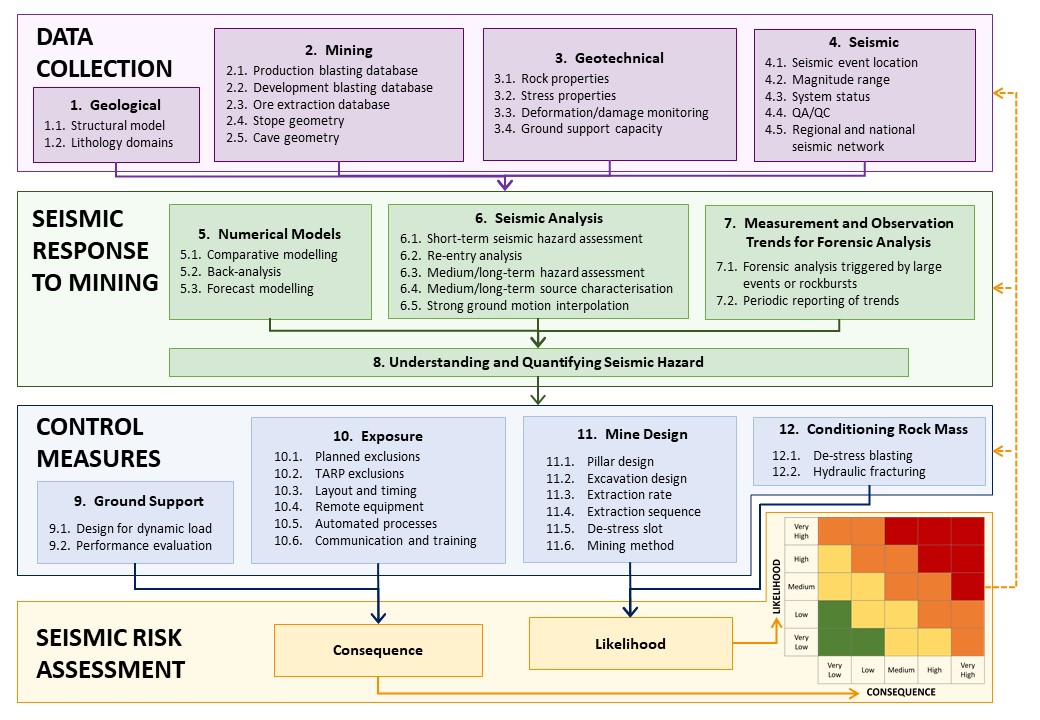
<div align="center">Click the headings and subheadings of the flowchart that you'd like to visit.</div> | <div align="center">Click the headings and subheadings of the flowchart that you'd like to visit.</div> | ||
<div align="center">[https://acg.uwa.edu.au/srmp/Downloads Download Flowchart]</div> | |||
< | <imagemap>Image:Slide1.JPG|Subtitle of Image Map Slide1.JPG|center | ||
rect 26 14 196 82 [[Data_Collection|]] | |||
rect 34 87 198 160 [[1._Geological|]] | |||
rect 214 27 462 161 [[2._Mining|]] | |||
rect 483 27 737 160 [[3._Geotechnical|]] | |||
rect 755 31 975 159 [[4._Seismic|]] | |||
rect | rect 20 195 156 376 [[Seismic_Response_to_Mining|]] | ||
rect | rect 169 203 370 317 [[5._Numerical_models|]] | ||
rect | rect 389 205 688 317 [[6._Seismic_analysis|]] | ||
rect | rect 706 205 973 317 [[7._Measurement_and_observation_trends_for_forensic_analysis|]] | ||
rect | rect 170 350 905 376 [[8._Understanding_and_Quantifying_Seismic_Hazard|]] | ||
rect | rect 23 410 235 477 [[Control_Measures|]] | ||
rect | rect 35 482 232 563 [[9._Ground_support|]] | ||
rect | rect 252 417 503 561 [[10._Exposure|]] | ||
rect | rect 523 417 735 560 [[11._Mine_design|]] | ||
rect | rect 754 417 983 486 [[12._Conditioning_rock_mass|]] | ||
rect | rect 18 600 767 704 [[Seismic_risk_assessment|]] | ||
rect | |||
rect | |||
rect | |||
rect | |||
rect | |||
desc none | desc none | ||
</imagemap> | </imagemap> | ||
| Line 30: | Line 26: | ||
<div align="center">This flowchart and all variations of this flowchart are the copyright of the Australian Centre for Geomechanics</div> | <div align="center">This flowchart and all variations of this flowchart are the copyright of the Australian Centre for Geomechanics</div> | ||
<div align="center">'''© | <div align="center">'''© 2024, Australian Centre for Geomechanics''' | ||
- [https://acg.uwa.edu.au/srmp/Downloads Download Flowchart]</div> | |||
== The Seismic Risk Management Plan == | |||
Welcome to the Seismic Risk Management Process Website. This website provides a summary of Seismic Risk Management Practices in hard rock mines and was developed by the [http://www.acg.uwa.edu.au Australian Centre for Geomechanics] (ACG) with the financial support of [http://www.newcrest.com.au Newcrest Mining Limited] (Newcrest). | Welcome to the Seismic Risk Management Process Website. This website provides a summary of Seismic Risk Management Practices in hard rock mines and was developed by the [http://www.acg.uwa.edu.au Australian Centre for Geomechanics] (ACG) with the financial support of [http://www.newcrest.com.au Newcrest Mining Limited] (Newcrest). | ||
<div align="left"> | |||
<div align=" | The Seismic Risk Management Process enables users to assess their own practices written in their Seismic Risk Management Plan against standard and advanced practices that can be applied for the management of seismic risks. It is also a valuable framework for the development and evaluation of a site-specific Seismic Risk Management Plan. Some mine sites are now using the process presented here as a generic framework and guideline for structuring and developing their site-specific Seismic Risk Management Plans.</div><br/> | ||
<div align>[https://acg.uwa.edu.au/srmp/Seismic_Risk_Management_Process:About About Website] - [https://acg.uwa.edu.au/srmp/About_Flowchart About Flowchart]</div> | |||
< | |||
< | |||
Latest revision as of 16:01, 7 June 2024
INTERACTIVE FLOWCHART
Click the headings and subheadings of the flowchart that you'd like to visit.
This flowchart and all variations of this flowchart are the copyright of the Australian Centre for Geomechanics
© 2024, Australian Centre for Geomechanics
- Download Flowchart
The Seismic Risk Management Plan
Welcome to the Seismic Risk Management Process Website. This website provides a summary of Seismic Risk Management Practices in hard rock mines and was developed by the Australian Centre for Geomechanics (ACG) with the financial support of Newcrest Mining Limited (Newcrest).
The Seismic Risk Management Process enables users to assess their own practices written in their Seismic Risk Management Plan against standard and advanced practices that can be applied for the management of seismic risks. It is also a valuable framework for the development and evaluation of a site-specific Seismic Risk Management Plan. Some mine sites are now using the process presented here as a generic framework and guideline for structuring and developing their site-specific Seismic Risk Management Plans.